
Enhance Soap Designs with Soap Angle Pour Tools
- craftedsurprise
- Mar 18
- 4 min read
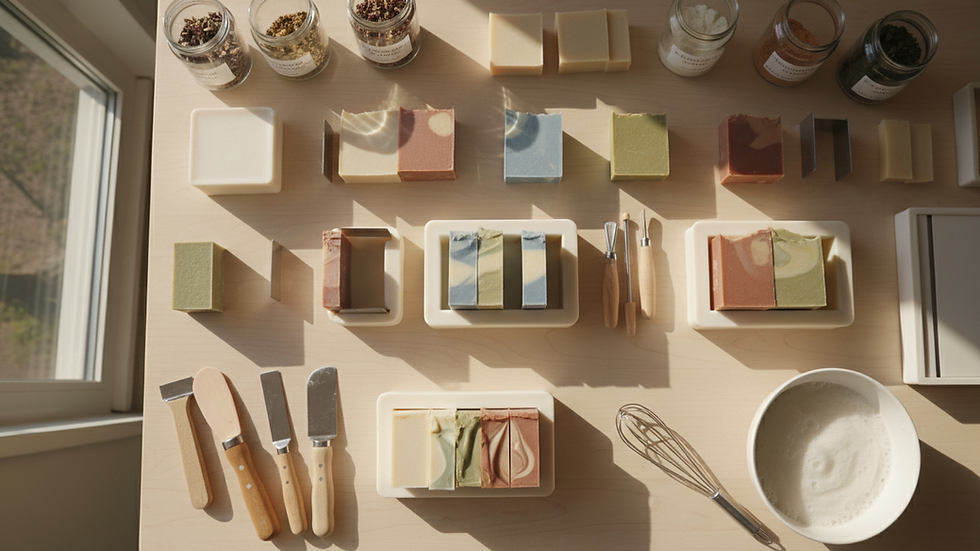
Creating beautiful, unique soap designs is a rewarding part of soap making. One of the best ways to elevate your craft is by using specialized tools that give you more control and creativity. Among these, soap angle pour tools stand out as essential for achieving clean lines, layered effects, and intricate patterns. I want to share how these tools can transform your soap-making process and help you produce stunning handmade soaps every time.
Why Soap Angle Pour Tools Are a Game Changer
When I first started making soap, pouring the mixture felt a bit clumsy. It was hard to control the flow, and my designs often looked messy. That changed when I discovered soap angle pour tools. These tools are designed to help you pour soap batter at precise angles, which is crucial for creating layered soaps or intricate designs.
Using a soap angle pour tool allows you to:
Control the flow of soap batter for sharper lines and cleaner layers.
Reduce spills and splashes, keeping your workspace tidy.
Experiment with new designs that require precise pouring angles.
Save time by making the pouring process smoother and more efficient.
The angled spout or lip on these tools guides the soap batter exactly where you want it, making it easier to create professional-looking soaps even if you’re a hobbyist.

How to Use Soap Angle Pour Tools for Stunning Soap Layers
Using a soap angle pour tool is straightforward, but mastering it can take your soap designs to the next level. Here’s a step-by-step guide to help you get started:
Prepare your soap batter as usual, making sure it’s at the right consistency for pouring.
Choose your mold and set it on a flat surface.
Hold the soap angle pour tool at the recommended angle (usually around 45 degrees) to control the flow.
Pour slowly and steadily to create even layers or patterns.
Allow each layer to set slightly before pouring the next to avoid mixing colors.
Experiment with different angles and speeds to create unique effects like swirls or waves.
For example, when making a layered soap with contrasting colors, the angle pour tool helps you pour each layer cleanly without disturbing the previous one. This precision is hard to achieve with a regular jug or container.

Tips for Choosing the Right Soap Angle Pour Tool
Not all angle pour tools are created equal. When selecting one, consider these factors:
Material: Look for tools made from durable, easy-to-clean materials like stainless steel or food-grade plastic.
Size and capacity: Choose a size that fits your typical batch volume. Smaller tools are great for detailed work, while larger ones suit bigger batches.
Local sourcing: Supporting locally made products means better quality and faster delivery. I always recommend checking out Australian-made options for reliability and sustainability.
Using a creative soap angle pour tool from a trusted local supplier ensures you get a product tailored for soap makers like us. These tools are designed with our specific needs in mind, making the soap-making process more enjoyable and efficient.
Creative Techniques to Try with Soap Angle Pour Tools
Once you’re comfortable with the basics, you can explore more advanced techniques using your angle pour tool:
Layered soaps: Create multiple layers with different colors or scents. Pour each layer carefully at an angle to keep them distinct.
Swirl patterns: Pour soap batter at varying angles and speeds to create beautiful swirls inside the mold.
Gradient effects: Gradually change the color intensity by pouring soap batter with slightly different shades.
Embedded designs: Use the tool to pour soap around embedded objects like dried flowers or herbs without disturbing them.
These techniques allow you to personalize your soaps and make them stand out, whether for gifts, markets, or personal use.
Maintaining and Caring for Your Soap Angle Pour Tools
To keep your angle pour tools in top condition, follow these simple care tips:
Clean immediately after use: Soap batter can harden quickly, so rinse the tool with warm water right after pouring.
Avoid abrasive cleaners: Use mild soap and a soft cloth to clean the tool to prevent scratches.
Store properly: Keep your tools in a dry place to avoid rust or damage.
Inspect regularly: Check for any cracks or wear that could affect pouring accuracy.
Proper maintenance ensures your tools last longer and continue to perform well, saving you money and frustration.
Elevate Your Soap Making with the Right Tools
Using soap angle pour tools has truly enhanced my soap-making experience. They bring precision, creativity, and ease to the process, helping me produce soaps that look as good as they smell. Whether you’re making soap for fun or selling your creations, investing in quality tools made locally in Australia supports your craft and the community.
If you want to explore more about these tools, I highly recommend checking out the range of handmade soap-making tools available from Crafted Surprise. Their products are designed specifically for soap makers and hobbyists in Australia and New Zealand, using locally sourced materials to ensure quality and sustainability.
With the right tools and techniques, your soap designs will reach new heights. Happy soap making!


Comments